Why You Should Drop Everything and Calibrate Your Monitors Now
Calibrating your monitors using your computer’s built-in tools is a cheap and easy way to improve color accuracy. So, why wait?
Windows and macOS have dedicated monitor calibration tools that can adjust how the monitor displays color, with color accuracy being the goal. But, why should you calibrate your monitors? For video editors, the answer is simple: color grading.
Color grading is the process of using tools to change how the colors in a video appear, and can totally change the mood of a scene. It’s a process that’s often under-appreciated, yet requires a lot of work to get right. Having a calibrated monitor ensures that the colors are accurate and the “grade” is also accurate, making it possible for the finished video to appear similar across many different devices. Color grading on an uncalibrated monitor may give you a false grade that appears very different when seen on a separate screen. Luckily, calibrating a monitor is easy, quick, and doesn’t cost anything except for a few minutes of your time.

The Primary Wheels in DaVinci Resolve are one of the tools used to color grade footage. With a properly calibrated monitor, the color grade on a video will appear more accurate and consistent across various displays. Image via Omar Tomaino.
Even if you’re not a colorist or a professional editor, you should still calibrate your monitors. If you’re worried about the process being complicated or requiring extra tools, don’t be. The process applies to external monitors for PCs and built-in laptop displays. All you need to know for external monitors is where the control panel is located since you may need to adjust the brightness and contrast levels.
Drop whatever you’re doing and take a few minutes to calibrate your monitors — your videos may depend on it.
Calibrating Monitors with Windows’ Display Color Calibration Tool
Calibrating a monitor using the Windows operating system is a bit more involved than on macOS devices, but it’s nothing complicated. To start, locate your monitor’s control panel and find out how to adjust contrast and brightness, which the Windows Display Color Calibration will ask you to do later. If you’re unsure how to do this, refer to the monitor’s manual or look online for answers (most manufacturers post the manuals online). Those with more than one monitor will have to do this for every monitor.
Before you continue, it’s important to know that this process isn’t automated. And, although the tool provides instructions and examples, the final calibration will rely mostly on your eye. So, follow the instructions closely and move the sliders carefully to find the perfect setting.
- Type Calibrate in the Windows Search Bar, which is located in the taskbar.
- Click on Calibrate Display Color.
- Place the tool window on the monitor you want to calibrate. Click Next at the bottom-right corner of the window to proceed. If you ever need to go back, click on the backward arrow on the top-left corner of the window.
- On your monitor’s control panel, find the Standard or Default setting. Proceed to the next step.
- Before adjusting the gamma, the tool will show you an example of what you’re looking for. If the middle of the circle is too dark or too light, adjust the slider until the image looks like the example image from the previous window. Proceed, once it looks right.
- Before you can adjust the brightness, the tool will show you three images, with the middle image being the goal. Proceed to adjust. Adjust the brightness via the Brightness Settings menu on your monitor until it looks like the middle image in the previous window. You want the make sure the X in the background is barely visible, but don’t over or underexpose the image. Go back a step if you need to reference the example.
- Next, you’ll adjust the contrast. Same as before, you’ll first see three images, with the middle image being the one with good contrast. Proceed to adjust. Using the control panel on your monitor, set the contrast as high as possible, without losing detail in the man’s shirt, such as the wrinkles or buttons.
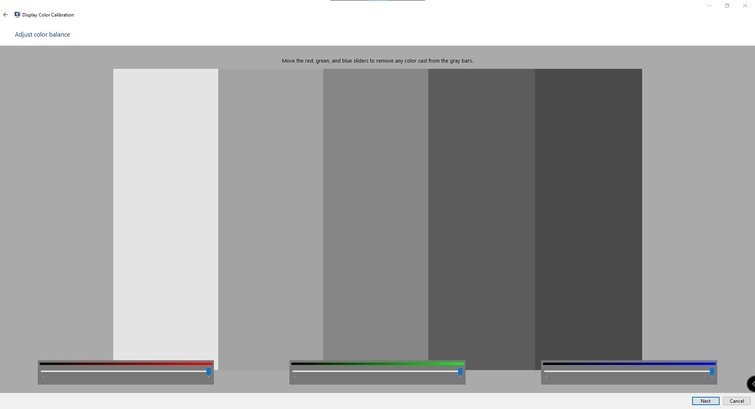
- Adjusting color balance is the last step. The goal is for the grayscale to appear as neutral as possible. Pay attention to the example screen. Proceed to adjust. If the grayscale doesn’t appear neutral, use the red, blue, or green color sliders below to get the desired neutral look.
- That’s it. You can click between the Previous Calibration and Current Calibration buttons to see your changes. Click Finish to close the window. Optional: You can checkmark the box below the text to run ClearType Text Runner, which is a color adjustment tool for text. If you have a second or third monitor, repeat the steps listed above.
Calibrating MacBooks and External Monitors with macOS’ Display Calibrator Assistant
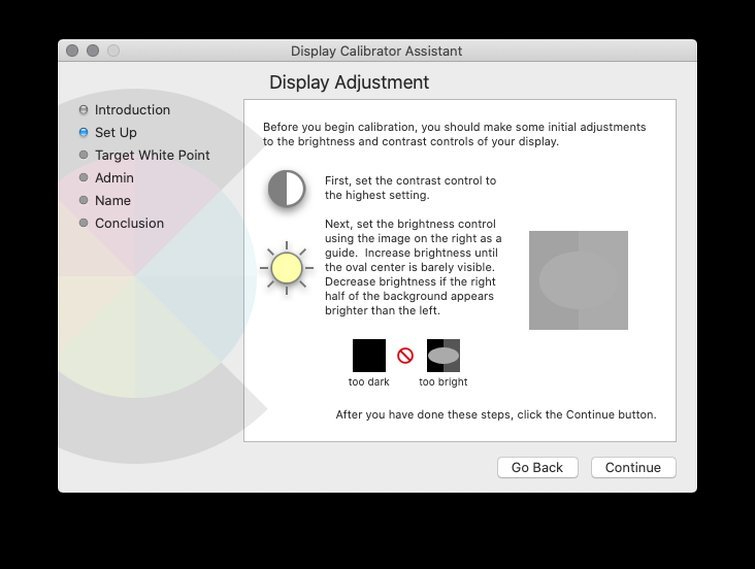
Using the Display Calibrator Assistant is easy and will only take a few minutes, but the steps vary depending on the computer. The calibration tool may skip or not show certain steps based on the computer. MacBook users have fewer options when using the calibration tool, and the Set Up step only applies to external monitors.
MacBook users will only need to adjust the target white point, which affects the display’s overall tint. Users can move the white point slider to find a warmer or cooler setting, but it’s recommended to use the Native White Point — the native white point can be selected by checking off the box. Those using an external monitor will need to adjust the contrast and brightness via their monitor’s control panel in the Set Up step.
The calibration tool has extra steps on iMacs when turning on Expert Mode. If toggling on Expert Mode on an iMac, follow the on-screen instructions for setting Native Gamma and Target Gamma, which affects luminance and contrast, respectively. The steps below cover the calibration process for MacBooks and external monitors and don’t cover the steps concerning gamma, though iMac users can still follow along.
- Open up System Preferences and open the Display menu.
- Click the middle tab labeled Color and click the Calibrate… button.

- The introduction step outlines what the tool can do. Click Continue. Skip the next step if you’re not calibrating an external monitor.
- This step is for external monitors only. Find the external monitor’s control panel and set the contrast as high as it goes. Next, adjust the brightness on the monitor until the oval in the image is barely present. The images shouldn’t look like the two example images below the text labeled too bright and too dark. Proceed to the next step when it looks right.

- The target white point affects the tint of the display, and changing it can make colors appear cooler or warmer, depending on the slider’s placement. To change the default target white point, unselect the Use native white point checkbox and move the slider.

- In the Admin tab, you can select to apply the calibration across multiple users. This only applies if you’re an admin on the computer. Click Continue to name the color profile.
- Type in a name for the new color profile. If calibrating an external monitor, use the monitor’s name for future reference. For example, HP 24 inch calibrated. This will save you some time if you ever buy a similar monitor and hook it up to your Mac.
- Click Done to end the process.
One More Thing: Professional Tools
The free monitor calibration tools built into the operating system are handy, especially when color correcting or grading video. But, they’re not perfect. The built-in tools are basic, and the degree of their effectiveness relies on the user and their subjective decisions on color, brightness, and contrast, even when shown examples and guides.
Ultimately, professional colorists and video editors should opt for a calibration tool such as a colorimeter. Datacolor’s SpyderX line of colorimeter is regarded as some of the best calibration devices. The SpyderX Pro costs $169.99 — a relatively affordable device that works with special software to get the best color from your monitor. Even if you’re not a professional, it’s worth picking up a device like this to get the most out of your monitors, and it’s something you can continue to use as your skills develop over time.
Cover image via Raevsky Lab.


