Thinking of designing your own home theater? A projector screen is a key piece in the set-up and mounting a projector in a home theater set-up gives a very chic and polished look to your media room (besides saving space and protecting the equipment).
Also, projectors are capable of projecting high-quality, large images onto a screen or wall, making them perfect for watching movies, TV shows, or even playing video games.
They offer a level of immersion that simply can't be matched by a standard TV.
If you are looking for a quick DIY guide on how to install projector or how to mount projector to ceiling, look no further.
Team Ooberpad is passionate about ensuring that the home theatre enthusiasts can install and use projection screens optimally for the best experience.
To ensure maximum benefits from video projection setups, you will need some cool tips and easy steps on how to install projector screen the right way.
With our easy tips in this article, you will know how to hang projector from ceiling like a pro
But First, Let’s Understand: Why Ceiling Mount A Projector?
Using a projector with a ceiling mount makes it easy to adjust the throw ratio/distance as you can place the mount according to your personal preference.
A ceiling-mounted projector also keeps it unobtrusive for people walking past. By having it attached to the ceiling, the projector can't be bumped out of position or knocked over.
If you have a regular throw projector, it just makes sense to mount it to the ceiling.
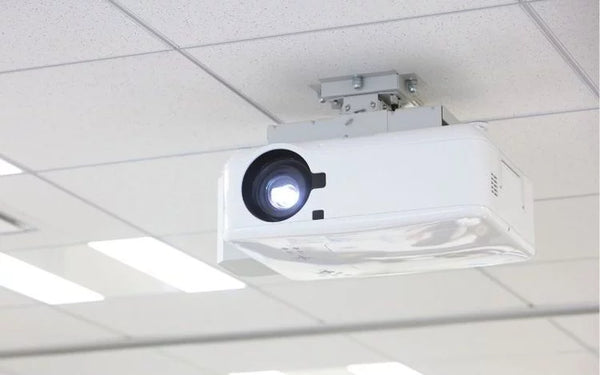
It would also be helpful to know that there are three types of projector ceiling mounts, above ceiling mounts, below ceiling mounts and projector lifts.
The type of ceiling you have and the projector you choose to buy will help decide what type of ceiling mount you need.
Also Read: Debunking home theatre projector myths
Things You’ll Need to Mount a Projector to the Ceiling
- Projector
- Mount Kit
- Screwdriver
- Wrench or Allen Wrench (depending on the mount)
- Tape Measurer
- Pencil
- Ladder or Step Ladder
- Drill
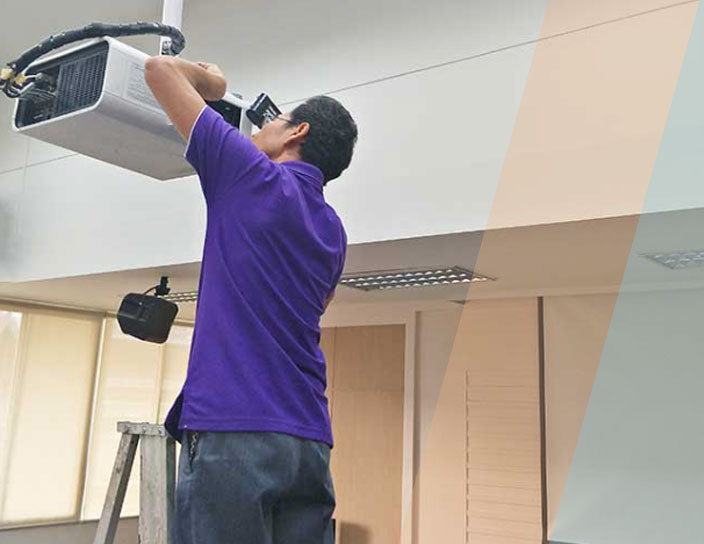
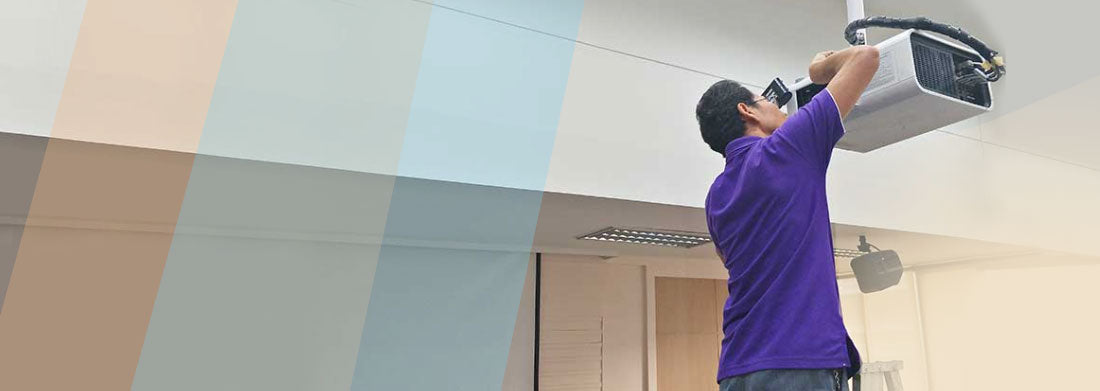
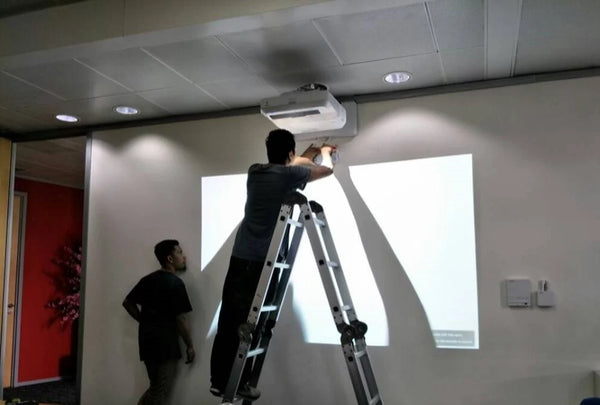
How to Install Projector - Easy Steps to Follow
- Decide where you want to install the projector: Consider factors such as the screen or wall on which you'll project the image, the distance from the projector to the screen, and any mounting options available.
- Ensure that the mounting surface is sturdy: If you plan to mount the projector on the ceiling or wall, ensure that the surface is sturdy and capable of supporting the weight of the projector. Use a stud finder to locate solid support beams if necessary.
- Mount the projector securely: Follow the manufacturer's instructions to securely mount the projector on the ceiling or wall. This involves using mounting brackets or a projector mount kit. Make sure the projector is level and aligned correctly.
- Connect the cables to the projector: The most common connections include power, video (HDMI, VGA, or other), and audio (if your projector has built-in speakers). Ensure the cables are properly inserted into their respective ports on both the projector and the source device.
- Position the projector to achieve the desired image size on the screen: You may need to move the projector closer or farther from the screen and adjust its vertical and horizontal tilt.
- Plug in the projector and power on the projector: Most projectors have a power button or remote control to activate them. Wait for the projector to warm up and stabilise.
- Adjust the image settings: Navigate the projector's on-screen menu using the remote control or onboard controls. Adjust the image settings such as brightness, contrast, colour, and keystone correction to optimise the image quality.
- Play a test video/display an image to check the projected image quality: Make any necessary adjustments to the focus, zoom, or other settings until you achieve the desired result.
- If required, recalibrate the installation: If required, recalibrate the projector's position, image settings, or screen placement until you're satisfied with the projection quality and alignment.
- Secure the cables to circumvent hazards: Use cable management solutions, such as cable ties or conduits, to organise and secure the cables running from the projector to the source device, power outlet, or audio system. This helps prevent tripping hazards and keeps the installation neat.
It’s important to go through the projector's manual for detailed instructions tailored to your model, as installation steps on how to install projector may vary.
Don’t Miss These BONUS Tips on How to Install Projector
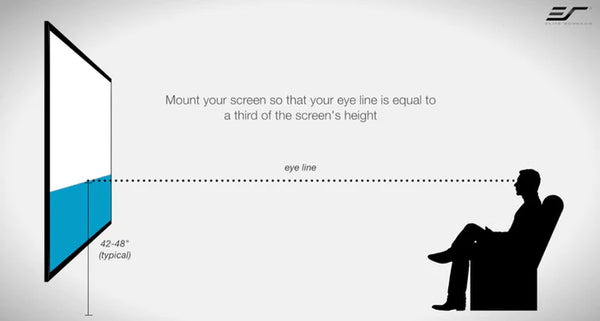
- Tip 1: Ensure that your head is at a comfortable level by first understanding your eye level: On average, a person’s eyes are at a level between 42-50” off the floor when seated. A safe sweet spot to work with is to assume about a 48” average for most people in that room. Bear in mind that the seating height is pivotal for this calculation.
- Tip 2: Your eye level should align with the boundary line between the top 2/3 and bottom 1/3 of the screen: An accurately mounted screen prevents you from experiencing visual distortion: With your eyes aligned 1/3 of the way up on the screen, the least amount of eye, neck or head movement is required for the viewer to easily view everything happening on the screen. So if your eye level is 48”, this should also align with the bottom 1/3 measurement of the screen’s height.
- Tip 3: An accurately mounted screen prevents you from experiencing visual distortion: The images appear naturally as your eyes would see in real-time. This also prevents unnecessary neck and eye fatigue from disrupting your ability to sit through a movie or a gaming session.
Also Read: Here's everything you need to know before you buy a home theatre projector
Problems with Ceiling Mounting a Projector and Quick Solutions
A projector needs a power source to turn on and a media player connected to it to show content. Most people don't have a power supply in the ceiling where the projector will be placed. And if you're building your own DIY media room you won't want to cut holes in your ceiling to run the HDMI cables and power cables.
With some trunking and some spatial thinking you can hide the wires pretty easily. If you don’t want to ceiling mount your projector you may consider using a shelf at the back of the room.
As an alternative, Instead of getting a regular throw projector, you can get an ultra short throw projector that sits directly under the movie screen.
The larger-than-life home cinema experience can be easily enhanced with a huge video projection screen set up the right way.
Hopefully, these expertly curated tips and steps on how to install projector will turn out to be useful for you. Also, you can talk to one of our projection experts who can help you determine the most suitable projector and mount combo.