Share

Are you familiar with a biscornu? It is an octagonal pincushion that usually incorporates an intricate pattern into its unusual shape. As part of this tutorial, we show you how to assemble a biscornu pincushion and share a beautiful cross stitch pattern made specifically for this project! We think these would make thoughtful presents for the stitchers in your life. Let’s get started on all those handmade gifts, shall we?
Skill Level: Advanced
Time: 10+ hours (including stitching time)

Additional supplies:
Bug Biscornu Cross Stitch Pattern (click to download)
Directions:
1. Cut two squares of Aida fabric into 6 x 6” squares.
2. Print Bug Biscornu pattern above. Stitch the TOP pattern onto one fabric square and the BOTTOM pattern onto the other. Be sure to center the pattern on your fabric. Begin with the main design - do not stitch the outer red border yet.

Remember that cross stitch is a slow craft. This step will need to be completed in multiple sittings.
3. Use one strand of embroidery floss (DMC 606) to stitch the outside red border around the TOP design. Trim the fabric down on all four sides to about ½” outside of the red border (or nine squares.) Repeat for the BOTTOM design.

4. Fold along the red border on all four sides of the TOP and BOTTOM designs. Use a pin to mark the middle of one side of the TOP design.

5. Thread the needle with two strands of embroidery floss (DMC 606). Tie a knot in the end. Bring the thread up through one corner of the red border on the BOTTOM design. Match the corner to the middle pin on the TOP design. The two designs will be stitched together by threading the floss through the border stitches on each design. Each square should line up exactly.

6. Thread the floss through the top stitch and the bottom, then over a square through the bottom and the top. You will continue this motion all the way around the perimeter.

7. Turning the corners on the biscornu is the most difficult part of the perimeter stitching. However, the process is the same. Keep the fabric squares lined up and continue stitching by weaving the floss up and down though the border stitch as you move along. My best advice is to take your time!

As you keep stitching and turning corners you will see your biscornu start to take shape!

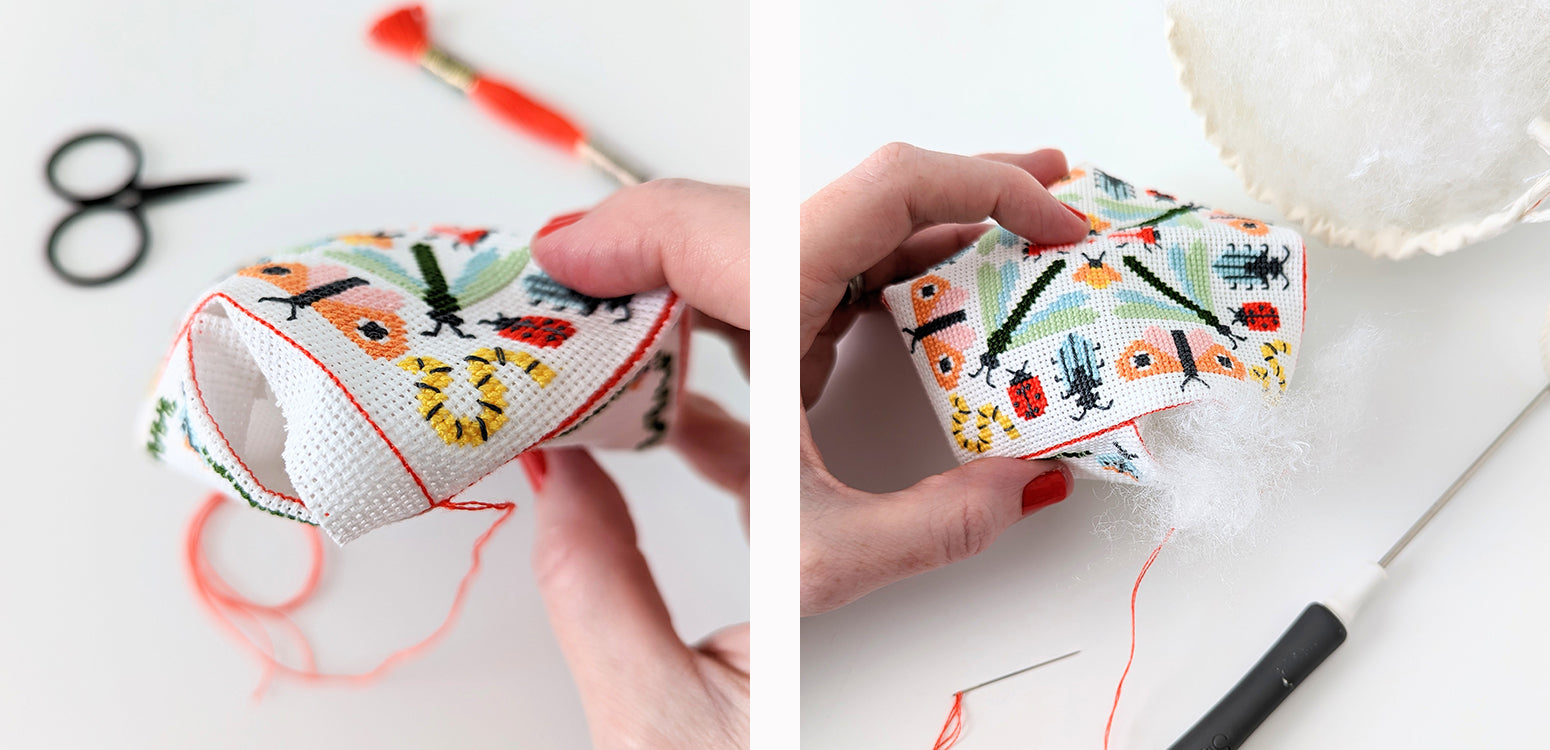
8. When you get to the last turn of your stitching, stop and stuff the pincushion. It should be nice and full but not excessively firm. Stitch closed. Tie a knot at the final corner and tuck the knot and trimmed end back into the pincushion.
9. The final step is to pinch the center of the biscornu from the middle of both sides. The guides on the pattern (+) mark the center. Use two strands of embroidery floss (DMC 606) to sew the wooden beads on the center of either side. Use the same length of floss for each and pull them toward one another to create the “pinch” in the cushion. Tie a knot underneath one of the beads and tuck it back into the fabric.

The thing I love about a biscornu is how complex it looks when finished! In addition to working as a pincushion, you can add a loop to one corner and use it as a decorative element. Enjoy!

Thanks to Camille for designing and writing this tutorial! You can follow her on Instagram @notsomodernmillie or visit her website. Stay tuned for more tutorials!


