
You are currently browsing the tag archive for the ‘Pinus radiata’ tag.
This year i finally feel like my pines are thriving after a long period of mediocre growth. This bad growth was due to a number of factors including:
- water pH Issues – Solved by moving to rain water.
- soil mix – I have recently moved to Akadama, Pumice and Scoria and believe this is a good improvement.
- fertiliser regime – This year i am using a two part hydroponic fertiliser and am applying weekly, and;
- strange seasonal variation – We have been in an ‘El-nina’ phase which resulted in cool wet years which even threw my tomato crops off kilter amongst other things
Most of the pines have been grown out last year and skipped de-candling to build their strength and from the below pics you can see they are responding well this year.


The Radiata is a fairly new addition to my garden after not having one for a while. I am treating it more like a Japanese White pine in regards to foliage management and so far am seeing good results. The process is essentially:
- Grow out the spring flush.
- once it stops extending, prune back leaving some of the new candle’s growth.
- New shoots form and grow out
- Thin needles
- Prune back new shoots to two and reduce length as per Step 2.
- Repeat.
I am guessing i will get 2 or 3 flushes per year using this method. So far needles have not come down in size much but as i build more canopy i assume this will slowly reduce the length.
I probably also need to play around with feeding timing but at the moment i am focused on building branching so am feeding heavily. A post for another day.
I’ve gown Pinus Radiata (Monterey pines) on and off over the years and have somewhat of a love hate relationship with the species. They have several good points and are readily available as escapees from the several large plantations close to home. They have great characteristics such as good bark, fast growth and seemingly high survival rate when collecting but………. That said, their foliage can be ‘scrappy’ and there seems to be a big difference between older examples and more modern plantation escapees which I think is due to the genetic selection of the forestry stock and how it has changed over the years. These younger trees seem to have much more twisty and messy needle formations and growth patterns compared to older stock examples.
Near home is one of the first radiata stock trees that was selected for a parent or mother tree of much of the forestry stock at the time (planted in the 1880’s). From what I understand this tree was used early on but is no longer a parent, as better examples were grown, bred and fine tuned.
That said i have been digging various specimens again with the idea of grafting them over to white pine or perhaps red pine to make use of the great bark but also get good foliage characteristics. Well, at least that was the plan…..
While out exercising the family in one of the local forests, I came across this radiata witches broom located not too high up in the canopy. I found another of these a couple of years ago, but while waiting for the right season to graft, the plot of trees was logged, losing my opportunity.
This one I should have a lot more time up my sleeve to try to get some material off it to propagate as the trees it is growing in amongst are much younger and likely 10 years away from harvest.
What are witches brooms I hear you ask? Essentially they are a form of damage to a tree (virus, insect or otherwise) that change the genetics of a particular area of growth on a tree often resulting in a dense twiggy dwarf section of growth. Often these areas can be propagated (via layer, grafting or cutting etc.) to retain these characteristics and create new versions of the parent stock.

This broom was showing dense growth and shorter more compact and neat needles so I am hopeful it may be a good candidate to replace scrappy radiata foliage with and still keep it in the family so to speak. Time will tell I suppose.
Who knows it could turn out to be a good new bonsai stock option. Many famous dwarf cultivars started as witches brooms; for example, yatsubusa Japanese black pine came from a witch’s broom on a kotobuki black pine.
ON A SIDE NOTE: Has anyone had much success grafting radiata pines (Monterey pines)? What species did you try? I’d be really keen to here about your experiences in the comments!
Amongst the display trees that I saw at collectors corner (which can be seen HERE and HERE) I noticed that a large percentage of the display trees were Pinus Radiata. In fact the first tree that greets you once you enter the nursery is a big old Radiata.

The welcome tree
This tree has been in possession of the nursery for a number of years and has always been an impressive bonsai. So impressive it seems it needs to be chained down!

Old bark
The old bark that the tree exhibits is beautiful and the crackled plates of bark seem in a good scale with the rest of the bonsai.
Now why does this tree have a post of its own? Well I thought that this bonsai was a good example of some of the problems that these old radiatas face. From a distance the tree seems to be full of foliage but upon closer inspection a different story is told.

A main branch
As you can see from the above image the foliage is only on the tips of long leggy branches. This is a problem. The tree has no inner buds and no fine inner branches to cut back to. What this means is that the outline of the tree can never be reduced without the aid of grafting as at least from what i have found and the experiences of other local growers with the species, Radiata’s dont bud onto old wood well.
What does this mean for this tree? Well I think it needs a major re-working. It is always nice to project the future onto trees so I will have a quick go at making a list of the things I think needs doing short of feeding aggressively, watering etc.
- The branches have all grown upward. The first port of call would be to correct this by doing some heavy bending on each of the main branches, bending them down to just below horizontal.
- Wire all the sub branches and prune growth back where possible. This would have a two-fold effect. Bringing the foliage down would allow for light to get into the inner areas of the tree as well as taking the dominance out of the tips. A tip that is pointed upwards will always grow strongly from the tip. If it is horizontal it is more likely to bud along its length.
- Feed feed feed. If you are to hope of getting budding on old wood you will need a healthy, strongly growing bonsai.
- I would then look at grafting opportunities to start re-introducing growth into inner areas of the branch structure.
I think with a work routine something like the above the tree could be vastly improved. A nice tree as it is (Age tends to excuse many faults) but I think it could be better. If it were ever to come up for sale I am sure I could find room for it at my place.
After seeing this tree I began to think if these problems are some that I might be facing with my Radiatas in the future. Hopefully through regular styling I can avoid the upward branch problems but I am a little concerned about the lack of back budding. Hopefully one day I will unlock the key to this dilemma. Perhaps in this case it is a result of a thick canopy shading out inner growth?I think the above tree had just been heavily thinned as my memory of it in previous visits was of a much denser canopy.
Either way, in the mean time I will keep on experimenting with my trees and keep dreaming about other people’s trees that I would love to own. One such tree that caught my eye at the nursery was the pine below. Again another Radiata.

Interesting?
Interesting or ugly?
I keep finding myself being drawn to trees with problems. I think I enjoy both looking at these bonsai that challenge the rigid frameworks some people use and also love to work on them to try to use those awkward features to form a design that works in a classical sense.

The heart of the problem or the heart of the opportunity?
Again I think the age displayed by this tree excuses a lot of the faults and in a way the faults in branch placement almost add to the ancient feeling the tree exhibits. Would I change things? Most probably yes, but I would like to live with the tree for a long while first to get to know each of its quirks.
Again I think with some creative styling and a total wiring this could become a very interesting tree. Another I could easily make room for at home.
It is interesting to note that this tree also seems full of foliage from a far but on closer inspection it is actually quite leggy and bare on the interior. Now I am not sure if this is a result of age or whether this is due to too thick a canopy being kept that has shaded the interior, killing the inner shoots. Hopefully it was a lack of light and not just the result of the species growth habits. If it is just a lack of light I can rectify this on my own trees.
Well i hope you have enjoyed these trees as much as I did. I always like to see old radiatas. I like to look into them and see if they will give away any hints that may lead to a future technique or method for getting them to back bud on old wood. Perhaps I will never find it, but I will definitely enjoy looking for it.
On that note, does any one out there have old radiata or Monterey pines? How do you grow them? have they ended up leggy? I would love to hear from you. Please comment below or email me at the address on the left of my website.
It’s that time of the year again.
It’s a time of the year that I both look forward to and dread. Once you amass a certain number of pines you begin to realise just how much time you need to set aside to give each tree its seasonal maintenance. This year, I have moved house and as a result some of the trees I would have normally have worked on earlier in the month were left until now, so the back log of tasks compounded the time I needed to spend on them. That being said, once I began the work I really enjoyed getting to see just how each tree had been growing over the season. When you thin needles you get to inspect very closely every branch of the tree and evaluate each new bud, needle and twig. You really get to know your trees while doing these tasks.
Why do you thin needles? You should thin needles at this time of year for a few reasons.
- By removing last season needles you let more light and air into the canopy which in turn encourages back-budding.
- By removing some of this seasons needles on strong areas you are able to balance strength across the tree foliage.
- By removing surplus needles you also reduce the amount of places that insects and other pests are able to hide.
I like to think that needle reduction for pines works a little like defoliation does for deciduous trees. I figure that the pine realises it suddenly has less foliage and as a result sets new buds which will grow the following spring to replace the needles that you removed. As pines cannot simply grow new needles they have to throw new buds. Most of these new buds will be dormant buds back within the canopy. These are the buds you want. This back-budding is what will give you foliage to cut back to in the future and which will prevent branches becoming leggy.
This year I have left a few more pairs of needles then I usually may on some trees as I plan to re-pot them come spring and figure they could benefit from the extra strength more needles will provide.

A Formal upright Black Pine in the making. This image was taken prior to beginning needle thinning.

The same tree after thinning. It is still very much in developement but after a few years of work i hope to have a more complete looking tree.

This is another JBP from the same batch as the above pine. It has developed much better than the above pine. It avoided many of the mistakes the other tree had to endure as i was learning. Photo was taken before thinning.

The same tree after thinning. It needs the apex developed but otherwise is on the right track. I am also planning to graft a back branch or two into the upper section this spring which may be the topic of a future post.
I also thinned my large Radiata. I again left more needles on it that i usually might for two reasons. The first reason is because I will be re-potting it this spring and I want it to be strong. The second reason is because I am experimenting with leaving more foliage on it much like you would on a white pine. We will have to see how that works out.

A Radiata branch prior to thinning.

And the same foliage after a light thinning.
Things have been a bit slow of late on the blog as I am in the process of moving both offices at work and houses. The good news is the house I am moving into has a bigger backyard and the office is closer to home. Both these factors should make for more bonsai time.
That being said I have still been thinking about Radiatas.
I had received some information that some growers in the USA were classing the Monterey pine in its own 3 needle group along with Ponderosa pines. So, i started looking for information on Ponderosa care to see if the techniques would cross over.
I was looking for ponderosa information when i came across Ryan Neil’s website. (Have a look if you haven’t already). After seeing the amazing work he is doing on ponderosas I decided to send him an email seeing if he was willing to share his techniques. He was. An excerpt is below.
Ryan Neil wrote:To answer your question about ponderosas, I do a few things that seem to help. The main thing is to focus on increasing the number of needles on the tree. With ponderosas, much like white pine, they are only geared up to produce one flush of growth/year. As a result cutting buds or needles is not an option and so the energy of the tree must be distributed amongst a large number of needles in order to dilute the strength put into any single needle. On very old Monterey Pine the same is true. This means not plucking any old needles until the fall and always feeding and fertilizing well during the development stage so as to increase bud and needle count. On most trees I have years that are sacrificial of needle size in order to get budding and density, after which I am able to control needle length much easier. I fertilize heavy during these sacrifice years and care little about needle length. However, once a reasonable amount of needles are present, I will not fertilize my ponderosa until September and only give them small amounts in the fall so as to not overly increase their vigour. Again, this applies to trees that have the bud and needle density I’m after.
I was really impressed with Ryan’s generosity and eagerness to share information. He has already demonstrated that he has a lot to give to the bonsai community and i am sure he will help to raise the standard of western bonsai further.
He did mention that he would at some stage like to come out to Australia so fingers crossed for the future.
What do people think about using his ponderosa techniques on Radiatas? His techniques seem to make a lot of sense and from my own experiences i had found that they do not respond very well to black pine techniques so treating them more like a white may be the next step.
If you read my previous post Pinus Radiata (Monterey Pine) Techniques you are probably wondering how the progress is going. The answer is slowly but surely.
After asking all over the net, i have come to the conclusion that not a whole lot is known about growing this species as bonsai. Funnily enough the most information came from Australians. I am guessing that this is due to its wide availability in Australia and Australia’s lack of other dig-able pine species.
There are quite a few growers of this species here and quite a healthy debate was started on Ausbonsai and some very nice examples of Raditatas grown as bonsai were posted. There was also a lot of interesting information shared such as how easily they airlayered.
What has come out of this? Well I think it will be a bit of an ongoing project, ticking away in the background. I plan to document over the next 12 months the various changes in a couple of my trees as they grow in the hope that once I understand their growth habits a bit better I will be able to work out a timing for pruning and candle removal.
I will keep giving updates from time to time as I document them.
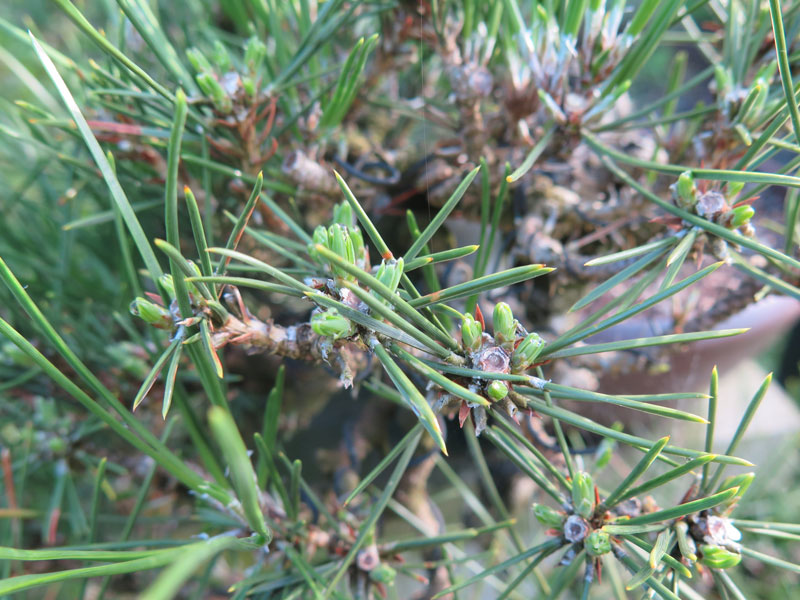
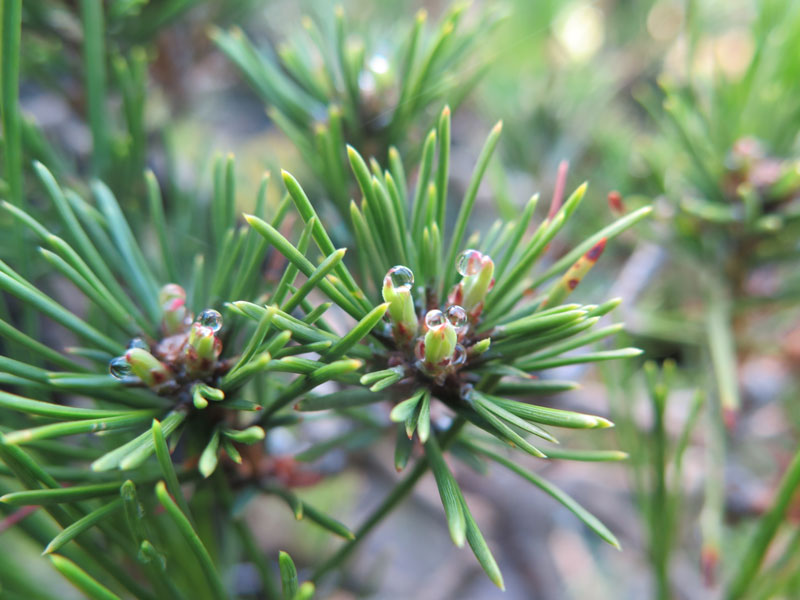
I will leave you with two images. Both images were taken on the same day, from different trees. One needed repotting and the other had been repotted this year. I think it is clear that one has neat needles while the other does not. This pair of images gives me hope i can get radiatas to consistently give short neat needles like those in the picture of the older tree.

A young tree

An older tree
Stay tuned.
Pinus radiata was first introduced into Australia in the early 1850’s but was not commercially planted in large numbers until the 1960’s. Since their implementation as a commercial timber crop, Australia has planted around 740 000 ha of the pine.
In plantations, seed produced by the pines germinates readily and many seedling pines can be found around areas where plantations are present. As Australia doesn’t have any true pines native to it, these plantation escapees are the closest thing to the yamadori pines of other countries that we have. In fact, the radiata is such a vigorous grower and reproduces so easily that in many states it is declared an invasive noxious weed species.
Pinus radiata or ‘The Monterey Pine’ although prolific as a timber species around the world is not commonly used in global bonsai circles. This is perhaps because it is a little quirky when grown as bonsai.
They have a lot of traits that make them ideal for bonsai. Fantastic bark, vigorous growth, highly flexible and the availability of ‘wild’ stock to be dug up all add to their bonsai credentials.

The needles of a mature Radiata bonsai
I have been growing a number of Radiatas and I am still yet to find the magic bullet for refining them.
Black pines seem difficult to grow until you understand their growth patterns and then prune, candle cut and needle thin at designated times of the year. The result of working within their growth habits produces neat and small needles and a large amount of back budding.
Radiatas I have not found as easy to master.
When I first started growing them I was told how easily they back budded and that you would have ‘almost too many buds’. This sounded too good to be true, and during the subsequent years of growing them I unfortunately found this to be the case.
The other problem I find with them is their needles. They can often be long, twisted and curled, but on some trees (one of mine being a key example) I have noticed shorter, neater and straight needles appear after the previous year’s unruly growth. This gives me hope that I may be able to work out a way to evenly force a neater shorter needle length by working with the tree’s growth cycles.
I have received a whole range of advice on taming this species. This has covered a whole range of often conflicting techniques, see below:
- Treat them like a black pine
- Treat them like a white pine
- Pinch them constantly like a juniper
- Wire one side completely, then later wire the other side
- Pot them in an open mix
- Pot them in a heavy mix
- Break candles in half
- Remove new growth totally
Over the next couple of posts I hope to generate some discussion with other growers that may dispel some myths and share successful techniques with the wider bonsai community. So if you know anything about Radiatas or grow them at home and are having similar problems please send me an email (Look under ‘contact me’ in the left side bar) or add a comment below.
To get people thinking I have included an old golden statements article to kick off the discussion that was written by Nancy Eaton on Mr Katsumi Kinoshita back in 1984. I used it as a starting point for my trees. Have a read and let me know what you think. Does the way you grow radiatas differ from those of Mr Kinoshita? I would love to hear about it. Next week I will begin to post about my experiences with the species and some of the things that have shown good results and others that have not been as successful.

Click to enlarge.

Click to enlarge.

Click to enlarge.

Click to enlarge.
The following bonsai is one of the first trees I collected a number of years ago.
It is a radiata or Monterey pine (Pinus radiata). I quite like the species to work with but i am still trying to really get a grip on how to best grow and refine them. Perhaps i should make a future post on this subject.
Before it began its life as a bonsai it was located on the edge of a pine plantation where it had grown on a road batter. It had a very interesting curve in the trunk which was either from machinery running it over at some stage of its life or from it trying to seek the light through the long, tangled grass in which it was growing.
After collecting it took a couple of seasons for it to recover and become strong enough to be styled.

The tree before is life as a bonsai. It was needle plucked and readied for its first styling.
I styled is initially at a club night as part of a demonstration. At this time i wrapped the trunk in electrical tape as a substitute for raffia and put a second large bend in the trunk. The bend seemed quite severe to those watching at the time but the little pine bent easily. I then wired it fully and placed the foliage.

The first branch bent into position before the major bend was made.

A top view taken some time after the first styling. The dotted line shows the trunk line. The second bend is the one made during the first styling.
The tree recovered well and I lived with its style for some years while working on ramifying the branches. I didn’t mind the style but, I always thought there was something not quite right about it.

The bonsai was growing well after its first styling. It was un-wired and soon needed work.

The back side. I had often looked at it from this side and thought about a possible front.

The front after a re-wire. It was around this time that the shari seen in the next images started to develop.
Even after a re-wire the style still was not sitting well with me so, i decided to take it to a critique session by a visiting Japanese Professional, Hirotoshi saito. He suggested that we do re-style and stand the tree up roughly 90 degrees. So, a few days later the tree was styled. It was quite a dramatic change but definitely one for the better.

The results after the second re-style.
That was back in July. The tree was very healthy and had grown strongly, as a result there were multiple places where wire was cutting in.

The pine after its spring growth.

A side view.

The back. From this view you can get an idea of the extent of the shari that naturally developed. Hopefully i can extend this over time to the front of the lower trunk.
It was time for some work. I plucked and cut needles to allow more light and air into the interior of the tree and also removed most of the wire. I was happy to see that most of the branches had set in position.

The tree after the work.
The tree is far from finished and i will need to re-wire it again this winter. Pines with movement such as this are common in collected pines in europe but you rarely see them in Australia.
Hopefully if everything goes to plan it will have a bright future in its new upright style.
Although there are many forestry species of pine planted around Australia, Pinus radiata is by far the most prolific. Known as radiata in Australia it is also known as the Monterey pine in places such as America where it is indigenous to.
As it has been planted on mass it is one of the few coniferous species that you can find to dig. They produce seed well and generally anywhere you find a plantation you will also find feral seedlings. This is so much of a problem in some areas that they are declared weed species.
The up side of all this is there are many opportunities to dig and grow these pine as bonsai.
The below pine is a radiata that i obtained through a friend. He had sourced it from an old grower who had no longer been able to care for it.
When i received it, it had a lot going for it; old bark, nice nebari and a trunk with some movement and age. These were all factors that encouraged me to pursue its future.
That said it also had a whole host of problems.
It was quite sick and all the needles were yellow. It had lost most of the lower branches and those that remained all were angled upwards and had foliage mainly at the tips. When I cut the tie wires in the pot it fell over because it had barely any roots.
I re-potted and fed the tree back to health over the corse of a year and then began to think about styling.

This was the tree before styling began
As the branches were all old with quite old bark i was reluctant to bend them into their future downward position in one go as i was pretty sure they were going to be brittle.

After the first round of bending
After bending the branches into the above positions almost every branch had began to crack. It was now a matter of letting the tree grow out and recover before completing the bending.
A year later the tree had been growing strongly and was ready for round two. I had slowly increased the downward angle of some of the branches over the course of the growing season but they had not yet reached their final possitions.

The tree had recovered well and it was time to make some decisions.
I had decided that the first branch would be removed and i would fill this visual position with a ‘Nozoki no eda’ or peeping branch. This type of branch is basically a first or main branch that originates from behind the tree but occupies the space a first branch would. This style of branch is often seen is junipers.

The branch removed
I removed the branch and began to wire the tree. You can see the result of this first real styling in the image below.

After the first styling
The tree was fully wired into shape and some jin was created at the base of the removed branch. I left it long for future use as a guy wire attachment point and still have not removed it. I will probably get around to shortening it and refining it this winter.
Since the above photo the tree has grown strongly and has had one re-wiring. It was starting to take shape and was ready to be un-wired.

After some strong growth.
I un-wired the tree and did a small amount of re-wiring mainly to the tips of the branches.
It is nice to reach a stage with a tree where you no longer have to wire every main branch.

After a basic wiring.
Above is how the tree ended up after a basic wiring. It really needs a full wiring which i plan to do this coming winter. Hopefully this seasons growth will fill a couple of gaps in the apex and generally give some more weight to some of the foliage and at the same time strengthen some of the weaker buds so i can reduce the branches to them.
The tree is really only beginning its journey to become a refined bonsai but most of the structure is there. Unfortunately the day that i took the above photo it was raining so the bark is dark and it is hard to see just how nice and crackily the bark is.
Radiata’s are a tree that i am still really trying to work out how to grow well. Last year i tried to treat them like a black pine and cut all new growth off around christmas time. It did not respond very well and didn’t really produce any back-budding. This year i am going to grow them a little more like some of the other growers in my area. That is they pinch out strong growth as it appears and continue to do so throughout the growing season.
I was kind of hoping that there would be a calendar bases technique i could use to remove the new growth but at this time it doesn’t seem like there is. Perhaps overtime i will understand them more and then will be able to develop a better method. In the mean time i will just enjoy watching them grow and the work associated with those phases.
If anyone has any techniques that work with these pines, please share them in the comments.
