
Reading Bill Peppas' recent article here on Fstoppers got me thinking about calibration again. For the most part, it's a fairly simple process to improve the accuracy of colors on your display. A good many of us simply need to invest in a Spyder or ColorMunki system and allow it to do its job. Correctly calibrating a monitor with a hardware Look-Up Table (LUT) is a little more involved, and I wanted to share the procedure for calibrating a Dell Monitor with the X-Rite i1 Display Pro.
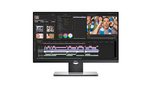
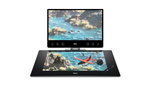
Over the past few years, Dell has released a series of wide-gamut monitors (U2413/U2713H/U3014) with hardware LUTs that provide more affordable solutions to offerings from the likes of Eizo. Hardware LUTs offer greater colour accuracy, but require specialized calibration tools in order to make the most of them. In the case of Dell's monitors, this means using their software and an X-Rite i1 Display Pro (the only compatible tool). With this combination, calibration is able to be written into the monitor's LUT for the most accurate color reproduction possible.
I recently took advantage of a sale on the i1 Display Pro, as until recently, I had been calibrating using a regular Spyder 4 Pro for ICC profiling. I had known this was not as accurate as it could have been, but after having to deal with a recent camera failure, I wasn't ready to spend the extra money just yet. When the i1 Display Pro arrived, I eagerly took it out and began the process immediately. However, I ran into problem after problem with the calibration and so decided to put together this guide for calibrating these monitors on Windows.
Step 1: Preparing the OS
Before calibrating your monitor's hardware LUT, you will need to remove any existing software calibrations (ICC profiles) and calibration software. Calibration software can be removed using the Windows Add/Remove Programs dialog, and custom ICC profiles can be removed in the Color Management dialog. You will also want to check “Use Windows Display Calibration” in the advanced tab of Color Management. As Windows loads ICC profiles automatically into the graphics card on startup, you'll also need to restart your machine before proceeding.
The final step for preparing to use the Dell software for calibration is to disable User Account Control (UAC) in Windows. You'll need to be an administrator to do this. It can be found in the Users section of your control panel. In Windows 10, simply slide the selection down to 'never notify'. This will stop all of those messages that prompt you to give permission when you're installing new software. This is essential, as the Dell software will fail calibration if it is interrupted.

Step 2: Preparing the Monitor
As with all hardware, it is usually prudent to keep the associated software up to date. Be sure you have the latest drivers for the monitor installed. They can be found on Dell's website or through Windows Update. Also ensure that the upstream USB cable that came with the monitor is connected directly to a USB port on the computer. Do not connect this through a USB hub, as calibration may fail if you do.
The next step is to use the monitor's factory reset to bring it back to its basic settings. Using the monitor's menu, navigate to Menu, Other Settings, Factory Reset. As something you have set in the menu may affect the accuracy of the calibration, this is required before continuing.
Dell's monitors come with several factory default calibrations such as AdobeRGB and sRGB. These cannot be overwritten, so we will need to select a custom calibration to write to. Again, using the buttons on your monitor, select Menu, Color Settings, Preset Modes, Color Space, CAL1. You can also select CAL2 for a second calibration after your first is complete, allowing you to have, for example, an AdobeRGB calibration and an sRGB calibration. This may be useful for some applications such as web browsing, where AdobeRGB colour space can cause issues.
Step 3: Installing Dell's Software
The only application that can write the hardware LUTs required to accurately calibrate these monitors is Dell UltraSharp Calibration Solution. After running the installation, connect your i1 Display Pro to the USB port on the back of your monitor.
Step 4: Calibration
If you have completed all the steps above successfully, you should simply be able to have a cup of coffee while the i1 Display Pro does its job. So, put the kettle on and open the software.
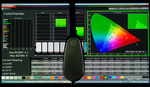
The first screen you will see is Display Settings. If you have multiple monitors, select your Dell monitor here. From the drop-down lists, select your RGB primary. For me, I have set CAL1 to AdobeRGB for photo editing. You can allow the i1 Display Pro to measure the ambient light in your room and set the luminance accordingly, or you can choose a custom luminance. In my room, the i1 measured the appropriate luminance to be 100 cd/m^2. If you plan to set it manually, remember that between 80 and 120 cd/m2 is usually appropriate. Anything brighter and you may strain your eyes quite a bit.

The next screen will be Measurement. If everything has gone well, you will see your i1 Display Pro listed and a color swatch on the right-hand side of the screen. From the drop-down list, select the name of the calibration you are going to overwrite — in this case, CAL1 (calibration 1 in the software). Click "Start Measurement," place your i1 Display Pro as instructed, and get that cup of coffee.
Once it's all done, the LUT will be saved for you and an ICC Profile will be created for Windows to use. Save this, and enjoy the best your monitor has to offer.


I already thought this seemed familiar: https://photographylife.com/how-to-properly-calibrate-dell-u2413-u2713h-...
:P
What about Mac?
The software from Dell only have hardware calibration in the windows version. The mac version is basicly the i1 pro software with a Dell logo.
I have the U2713H rev1 with it's flaky usb, so the usb ports on the display only works every blue moon.
I have an NEC PA271W and it seems to have come with the same calibrator. I don't think I ever made any ICC profiles to remove since installing the monitor but the process of using the calibration software that came with it was quite easy and quick.
Hi guys
I'm an amateur landscape photographer. I am planning on buying either the U2413 or U2713h as they support wide-gamut and within my price range. What is your opinion about these monitors? Are they pretty accurate from monitor to print with calibration.
Thanks in advance!
The *best* monitor reviews:
http://www.tftcentral.co.uk/reviews.htm
http://www.prad.de/new/monitore/testberichte.html
Both are old models, the new models are UP2516D and UP2716D.
They are OK monitors and the color is accurate, but the panel is not much
homogeneous, lets hope the new models have fixed the 'Uniformity Compensation'.
See http://www.tftcentral.co.uk/reviews/content/dell_u2713h.htm#uniformity
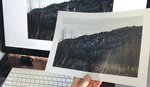
Both those monitors are just fine for everyday use. I personally use the U2413, and have found it to be great for all intents and purposes. Just pick your size and enjoy the beautiful colour rendition you'll get compared to a standard monitor. Going beyond this as a hobbyist is overkill unless you're really in it to ensure every dot of your prints look exactly as they do on the monitor.
Hi thanks for the article. I have a Dell u2413 using win 7 and a i1 display pro. Its connected with hdmi. How can u be sure if its working at the highest bit rate that the monitor can work at. Its not the newest graphic card and it doesnt have a dvi port. Best regrads Kristian
Kristian, in order to get the 10 bit per channel workflow going, you will need the invest in an nVidia Quadro video card. Technically, the monitors mentioned here (including yours) are actually 8bit + 2bits of 'interpolated' colours as far as I am aware. Getting the Quardro would give you smoother gradients and access to more colours, but only through certain applications (like Photoshop CS6 and later). HDMI SHOULD be able to send the right data across if both ends support the colour mode.
Thanks Dylan. Any advice about finding out what nVidea quadro video card to buy, . Where you get best value for the money. It looks like a jungle!
Im a photographystudent, so im not rich.:)
NVIDIA Quadro K4200 vs PNY NVIDIA Quadro K2200 maybe?
No first hand advice here, unfortunately. I still use the standard 8 bit loop. Any of the Quadros with a DisplayPort Adaptor will work for Photoshop, however. Contacting nVidia directly may lead to a more in depth result. I'm not sure as a student why you'd be looking to invest in this? The greatest benefit to be had by working completely in 10bit will be seen by getting into higher end monitors like the Eizo models, which are natively 10 bit.
Its because im planning to build my own computer. So im trying to figure out what hardware to go for. Yes maybe its overkill with a 10(30)bit workflow. :) But i found this page where they also recommend nVidia quadro videocard because the drivers are more stable than ati. http://www.imagescience.com.au/kb/questions/141/Build+a+powerful+PC+for+...
Thanks again for the advice.:)
And yes im a nerd who wants to get the same result on print as i see on the monitor.:)
Some advice from dell to get more correct color regarding Videocard. http://en.community.dell.com/support-forums/peripherals/f/3529/t/19565222
Thank you for the write up on this as I have essentially the same set up on my PC with a Dell U3014 monitor. I did the 30-bit thing with a Quadro card and such which made a subtle but noticeable difference but haven't taken the time to pick up an i1 Display Pro to do the hardware LUT calibration.
How noticeable is the difference between it and just using the Spyder 4? I haven't had any issues with my prints matching the screen using the Spyder, but I'm always looking to get the best out of my gear...
I found the difference to be huge between the i1 and the Spyder, especially with saturation levels. Skin tones are much closer in prints now. I had no problems with the Spyder until I started using the Dell monitor. Not sure where the problem was, but reds and blues were much higher saturated on the monitor.
Dylan, thank you for the reply. I'll have to keep an eye out for a deal on the X-rite.
In such cases using DispcalGUI or Spectracal's CalMAN will result in a better calibration than the i1profiler software.
I bought new Dell UP2516D, already having I1 Display Pro: did the right procedure for calibrating CAL1 (adobergb) and CAL2 (RBG). All working done!!
Problem is: by the time this procedure operates on HARDWARE LUT of the monitor, and DO NOT AFFECT software Windows profiles , at the end of this i have the two LUTS of monitor correctly loaded, BUT....Windows profile still resetted at default : so if i open an image with the viewer of Windows the colours are DIFFERENT than same image openend on Photoshop (where i have AdobeRBG default profile set).
The questin is: at the end of calibration procedure, it also builds color profile .ICM ....Have i to load on Windows ??????
ty on advance
Is it right to calibrate a wide gamut monitor with regular Geforce instead a Quadro OR FirePRO?
I know this is an old article, but maybe I'll get a response.
I am confused as to why the hardware (monitor LUT) calibration saves a windows ICC profile?
From my understanding, this is where software calibration should be stored, and hardware calibrations are stored in the monitor. It is also my understanding one benefit of this is that I can plug in my monitor to a different computer the monitor will still be calibrated. How is this so if my ICC LUT profile is stored on computer "A" and I then connect computer B?
Confused! :)